6 Easy Steps To Reduce Radon

EPA does not recommend sub slab suction as the only way of reducing radon levels in your home.

In a real estate transaction there is limited time to test and mitigate radon concerns. Time is of the essence and contractual agreements must be completed. So typically when radon levels exceed the EPA guideline of 4.0 picocuries, buyers will demand a sub slab suction pipe and fan be installed in the home. This is an approved and proven method of reducing radon levels, but it is also the most expensive.

Radon gets into our homes when there are cracks and openings in the below grade foundation and floor slab or when the outside air pressure exceeds the interior building pressure. Understanding this opens up a savvy Realtor or homeowner to alternative, less costly, methods of mitigating high radon concentrations.

Try these before spending a lot of money:

Step 1. Get out a caulking gun; caulk all cracks in the floor and walls. Pay particular attention to the connections between the floor and walls, beam posts, sump basket, plumbing pipes and drains.

Step 2. Get on a ladder; make sure the top of the foundation walls do not have any cracks or open cores.

Step 3. If you have a sump basket, seal the cover shut and caulk the edges.

Step 4. Make sure there is no exposed dirt in the basement or crawl space. If so, those areas would need to be covered with 6 mil poly and the seams taped.

Step 5. Open furnace supply air registers in the basement and close off the returns. Turn the fan switch on your thermostat from auto to on. This continually circulating air will pressurize the basement.

Step 6. Re-test

This may be a good reason to have your home tested for radon before you put it on the market. It may save you some aggravation and money!

For more about Radon and other hot topics ‘Like’ us on Facebook!

Doug Hastings
MN Home Inspector, Minneapolis & St. Paul
ASHI certified inspector, ACI
Kaplan University, Home Inspection Lead Instructor

Rob ‘Pops’ Leslie
Kaplan Professionals, Retired

Does Your House Breath?

I never had frost buildup on my windows before!

Like many houses my 1974 rambler was in need of attention.  For the past 5 years my justification for postponing the needed exterior maintenance was the bad economy.  I felt investing a large sum of money in the house was not wise.  Some of you may agree with this and some will not.  Regardless, at the insistence of my wife, last summer became the year of THE HOME IMPROVEMENT.  We contracted for new roof, windows, doors, siding, soffits and fascia.  Keep in mind to meet new state building and energy code requirements housewrap, window and door flashing, caulking, weather-stripping, and low E glass need to meet a very high standard of insulation and heat loss.  This old leaky house no longer leaked.  It is warm and comfortable inside, but this lack of breathability resulted in very large frost buildups on all of our windows and doors as soon as the weather changed.  Any home inspector would quickly recognize this as a problem that needed to be resolved now.  By ignoring this very obvious moisture sign, which many homeowners do, the next concern is going to be mold.  (http://bit.ly/19ut8aA)

I never had radon before!

But…it didn’t stop there.  As a MN home inspector radon testing is a big part of our business operation.   I had tested the basement previously and my radon concentration was at the minimum EPA standard of 4.0 picocuries.  Upon re-testing after the exterior remodeling was completed, my radon level is 3 times higher.  What is the lesson to be learned from these 2 events? (http://bit.ly/1huOoxd)

Houses work as a system.  By changing the exterior envelope of a home it will have a huge impact on how the interior functions.  What was never a problem yesterday may be a major problem today. 

Doug Hastings
MN Home Inspector, Minneapolis & St. Paul
ASHI certified inspector, ACI
Kaplan University, Home Inspection Lead Instructor

Rob ‘Pops’ Leslie
Kaplan Professionals, Retired

What Is Ventilation?

Ventilation is not just air blowing in through an open window and it certainly isn’t the bathroom fan turned on to get rid of a bad smell. 

In a previous blog, I stated that many older houses are now much tighter than the owners believe. Remodeling, changing surfaces and even a coat of paint can do a lot towards tightening the house and reducing its ability to breath. You should, if you own a house that has new siding, exterior windows or doors installed, be concerned that there is an inadequate amount of ventilation. High humidity levels can cause all sorts of visible and concealed moisture damage to a home. Some clues are frost buildup on windows, ice dams, mold and wood decay.

Ventilation, broadly, is an equal exchange of stale air being continually exhausted from the house shell while being replaced by clean atmospheric air at code specified rates.

There are two general methods of ventilation:

  • The first is balanced ventilation. This requires design by an expert in the field. In balanced ventilation two fans of equal volume will be installed. One will suck air into the housing shell from outside and the other will blow stale air from inside the shell to the outside. Often the two air streams pass, side-by-side, through a heat sink material so that the heat being exhausted from the house may be captured and returned in the incoming air. Systems that employ this kind of heat exchange are usually about 70% efficient.
  • The other method is unbalanced ventilation. Unbalanced ventilation can be a fan sucking air into the house from outside and exhausting, by the pressure created, through an existing vent. Or, more typically, it would be just the opposite. Outside air would come in to the house through a lowering of pressure caused by an existing exhaust fan operating in the home. This method is not nearly as efficient as balanced ventilation but it will do the job.

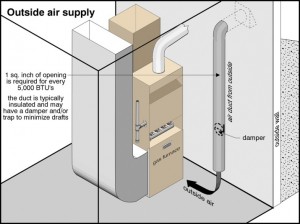
The easiest and most economical way to ventilate your home is unbalanced ventilation. This is something that you can do yourself at a cost of a few hundred dollars. Some homes may already have the equipment in place and it will take little effort to implement. First you will need to select an existing exhaust fan in the bathroom or perhaps in the kitchen that is vented to the outside. Next, you need to create a vent opening in the basement, connect an insulated flexible air duct, and extend this pipe to the floor. The outside vent cover will need a screen to prevent vermin from entering the home. You may already have this pipe; it would be an open pipe near the furnace called an outside air supply. Finally, turn on the exhaust fan and run continuously. This will remove the stale warm moist damaging air in the home , replace it with fresh cold dry outside air and not depressurize the home. You are now controlling the quality and moisture level of the indoor air.

Any exhaust fan in the home will give you a result. Just remember that the smallest fan required by code is 40 CFM. The higher the CFM fan rating the quicker the home will complete a complete air change. Fans are typically rated from 40 to 130 CFM.

Doug Hastings
MN Home Inspector, Minneapolis & St. Paul
ASHI certified inspector, ACI
Kaplan University, Home Inspection Lead Instructor

Rob ‘Pops’ Leslie
Kaplan Professionals, Retired

Categories

BLOGS BY CATEGORY