New MN Radon Law Effective Jan. 1 2014

Sellers must declare the results of any radon test to potential buyers beginning January 1, 2014.

This new MN Radon law is quite wordy, but can be essentially distilled down to just two issues:

  1. Testing by the seller is not mandatory.
  2. The event of a radon test having been performed, the result must be made available to potential buyers before the sale is closed.

Buyer’s agents will obviously be recommending to their clients that they request a radon test from the seller. Selling agents should get ahead of this by recommending to the client that they have a radon test performed and any needed mitigation carried out before the house comes onto the market.

Testing is not expensive and should be carried out by a reliable professional.

Many quality home inspectors offer this service. In the event that mitigation is required, care must be taken to find a reputable mitigation professional. Mitigation is usually quite inexpensive and can be as simple as balancing the ventilation of the house. This can be done by installing an outside air inlet duct balanced by a continuously operating exhaust fan. A bathroom fan would be a good example. Balanced ventilation overcomes negative pressure, which draws radon into the home through the foundation wall or floor. Balancing ventilation can create a real bonus because moisture is often drawn into the house through negative pressure and that moisture creates an ideal atmosphere for mold growth. So by simply balancing the ventilation in a house: you may often have three benefits. Radon intrusion will be overcome, moisture will be reduced, and mold will be prevented.
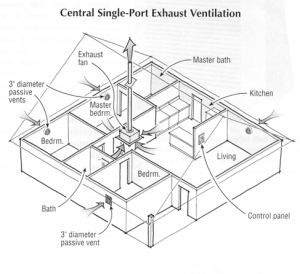
Very often, after the ventilation of the house has been balanced, simply applying a coat of a radon resistant material to the floors and walls of the basement will resolve the radon issue. More expensive mitigation may be necessary, requiring the installation of either a passive or mechanical radon ventilation system. However, the cost of mitigation should not exceed one to two thousand dollars; even when the mechanical system is installed. In the case of balanced ventilation the cost may be as little as a few hundred dollars.

Be proactive: make certain that a radon test is done on every sale and use a qualified home inspector to ensure a professional result.

Doug Hastings
MN Home Inspector, Minneapolis & St. Paul
ASHI certified inspector, ACI
Kaplan University, Home Inspection Lead Instructor

Rob ‘Pops’ Leslie
Kaplan Professionals, Retired

4 Top Tips to Keep You & Your Home Safe for the Holidays

What is the #1 cause of house fire?

The answer is electrical wiring. During the holiday season wiring to Christmas lights and trees are particularly dangerous. Some tips to keep you safe are:

  1. Carefully inspect light strings each year and discard any with frayed cords, cracked lamp holders, or loose connections.
  2. When replacing bulbs unplug the light string and match voltage and wattage to the original bulb.
  3. For exterior lights use only those rated for exterior use.
  4. Both interior and exterior lights should have an Underwriters’ Laboratory label.
  5. When connecting multiple strings of lights check how many can be safely strung together according to the manufacturers specifications or UL listing.
  6. When hanging outdoors lights keep electrical connectors off the ground and away from metal gutters and overhangs.
  7. Never connect more than one extension cord together. Don’t use extension cords that are too long. Never install an extension cord under a rug or near a heat source.
  8. Make sure each outlet you plug into is not overloaded.
  9. Always turn off lights when you leave the house or going to bed.

What is the #2 fire hazard?

Over 40% of all home fires are caused by defective heating equipment. If you haven’t already, you should schedule a tune up and safety check of the water heater, furnace or boiler before Christmas. Be sure the heat exchanger, the vent and flue are inspected. These are the primary causes of fire or CO poisoning.

Don’t forget to inspect both gas and wood burning fireplaces for condition and safe operation. Use a screen or glass door and never leave any fireplace unattended. Don’t burn gift wrappings, tissue, or evergreens in the fireplace.

#3 Keep your Christmas tree away from the fireplace, keep water in the base, and turn off the lights when you leave the home unattended.

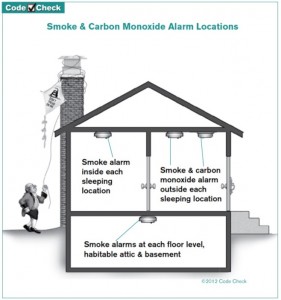
#4 Check your smoke and carbon monoxide detectors.

Enjoy this very special season!

Doug Hastings
MN Home Inspector, Minneapolis & St. Paul
ASHI certified inspector, ACI
Kaplan University, Home Inspection Lead Instructor

Rob ‘Pops’ Leslie
Kaplan Professionals, Retired

Can I Use An AFCI In The Place Of A GFCI?

Not if you want to stay healthy!

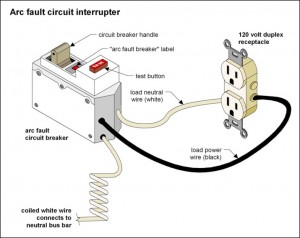
Both units, although very different in function, look alike in the electrical panel. They look like conventional circuit breakers with a test button on their face and they both attach to the panel in a normal circuit breaker slot and are bonded to the neutral bus bar with a, rear mounted, tightly coiled white wire.

The AFCI, Arc Fault Circuit Interrupter, was introduced to residential electrical codes in 1999 with the requirement to install them in bedrooms and has quickly gained acceptance, particularly with Fire Marshalls, because the device reliably opens damaged circuits that are overheating because of arcing (mini fires). Recent editions of the electrical codes have included installation in most living areas. Unfortunately, there are other over-heating issues with circuits that cannot be detected by the AFCI, such as an electric motor starting or someone pulling a cord out of a live outlet or wires overheating through high current demand meeting high resistance without any arcing occurring.

When must I install these devices?

Never! Installing these critical devices is a job for a licensed electrician. They can advise you as to the necessity for installation of these devices and proper wiring technique. Except for a room addition or replacement of an existing failed device, AFCI’s are usually only installed in new wiring systems.

Where does today’s code require these devices to be installed?

AFCI’s are installed in all bedrooms and living areas, but not unfinished basements and garages. GFCI’s are installed in all potentially wet areas, including kitchens, bathrooms, basements, and exterior outlets. Some circuits can even require the installation of both an AFCI and a GFCI.

Doug Hastings
MN Home Inspector, Minneapolis & St. Paul
ASHI certified inspector, ACI
Kaplan University, Home Inspection Lead Instructor

Rob ‘Pops’ Leslie
Kaplan Professionals, Retired

AFCI or GFCI That Is The Question

Is an AFCI the same as a GFCI and what is a GFI?

AFCI or Arc Fault Circuit Interrupter and GFCI or Ground Fault Circuit Interrupter are names for similar looking electrical devices that are used for very different purposes.

  • An AFCI protects an electrical circuit against a specific kind of arcing. It’ function is to prevent overheating and fire because of damaged or broken wires, loose screws and wire connections. It does this by disconnecting the circuit breaker or fuse before the arc creates a fire.
  • A GFCI is very different. It measures current flow over the hot and neutral wires in circuit acting like an off switch if the amount of current in the 2 wires is not in balance. The assumption is the imbalance is caused by current flowing through you rather than the circuit.  Not a good situation because you essentially become the light bulb.

A GFI or Ground Fault Interrupter is what we used to call a GFCI. The electrical code simply changed the term to make it more precise.

In short, 
The AFCI protects your home from fires caused by wires that overheat through arcing.  The GFCI protects you from being electrocuted by current rushing through your body as it takes the path of least resistance to ground. The GFI only makes electricity more confusing to understand than it already is.

These devices save lives…your home is calling out for these improvements.

Doug Hastings
MN Home Inspector, Minneapolis & St. Paul
ASHI certified inspector, ACI
Kaplan University, Home Inspection Lead Instructor

Rob ‘Pops’ Leslie
Kaplan Professionals, Retired
Knock Knock…What’s Leaking?

My plumbing pipes bang since I installed a new front loading washing machine.

Many people who have installed similar machines have the same question. You are experiencing water hammer. This is a serious problem, which should be overcome as soon as it is possible. The noise that you hear is caused by the sudden closing of the machines solenoid valves. This causes massive pressure changes in the water piping. The result can be broken or leaking pipes. Can’t you just hear the whisper of running water while you’re still at work?

This problem can be overcome by the installation of water hammer arrestors, which are also called shock or surge absorbers. In the case of frontload washers they should be installed on both the hot and cold water lines just before entering the machine.

High-efficiency dishwashers often have the same problem. 

The cure is the same. The water hammer arrestor is needed, on each line, at the point where waterlines enter the machine.

Some homes never have the problem, simply because the installing plumber has installed a whole system surge absorber on the first vertical pipe after the water meter. So, you have a choice of installing a surge absorber large enough to service all plumbing in the house or individual units at the offending appliance. This is not an easy decision. To be sure you do not make the wrong choice…

As always, you will save time and money by calling an expert!

Doug Hastings
MN Home Inspector, Minneapolis & St. Paul
ASHI certified inspector, ACI
Kaplan University, Home Inspection Lead Instructor

Rob ‘Pops’ Leslie
Kaplan Professionals, Retired
Getting The Heat On

How do I prepare my furnace for winter?

Great question and even better timing! The quick answer is, except for checking a few basic items, you don’t. This is a job for professionals. Winter is close and if it’s another few weeks before you get around to a furnace tune-up you are going to be waiting in line for your contractor.

One thing you can and should always do, at the beginning of the season and then monthly, is to change the furnace filter. You will find it in the metal duct connected to the furnace, just before the air enters the lower fan section. A clean filter improves efficiency, performance, and safety.

Did you know a perfectly good furnace can create CO because of a dirty filter!

By robbing a furnace of air, combustion (the burning of fuel) will not be complete and a byproduct of incomplete combustion is CO.

The new high-efficiency furnaces are essentially people proof; good care for a homeowner would be looking for rust and moisture on the floor or behind the front cover. Older furnaces, however, can very often be operated in a condition that permits back draft which allows deadly gases to enter the home. Here the main indicator of a problem would be loose metal chips or scorching near the burners behind the furnace door. With all furnaces you could check the quality of the burner flame.  This will tell you if it’s burning safely.  The entire flame should be blue; orange flame tips indicate improper burner settings and yellow tips indicate the presence of carbon monoxide. Finally, check the round exhaust pipe which is on the top of the furnace. If this is rusted, scorched, has holes, or is leaking moisture it is unsafe and needs to be replaced.

After all that…still make The Call

Having a pre-season professional tune-up will give you peace of mind and will very likely save you money over the heating season.

A furnace, out of tune, having a cracked heat exchanger or even missing covers can be a source of carbon monoxide emissions. Unfortunately, we don’t get a second chance with carbon monoxide. It is a tasteless, odorless, colorless gas that kills many people during the heating season.

Doug Hastings
MN Home Inspector, Minneapolis & St. Paul
ASHI Certified Inspector
Kaplan University, Home Inspection Lead Instructor

Rob ‘Pops’ Leslie
Kaplan Professionals, Retired

My Furnace Is Leaking!

My laundry floor is soaked but I can’t find a pipe leak anywhere! 

I don’t believe you have a pipe leak. I think you’ll find that the water is coming from the bottom of your furnace because the air conditioner ‘A’ coil drain is blocked. “What is an A coil drain?”

The A coil (which is like a car radiator shaped like the letter A) sits in the air delivery duct just above the furnace. This evaporator coil is used for air-conditioning. When operating, it gets very cold and the air flowing over it and through the duct becomes cooled. The sudden drop in temperature causes the air flowing over the coil to give up its moisture (cold air does not hold the same amount of moisture as warm air). The moisture then runs off the coil into a drain pan and is transported through a plastic pipe to the floor drain. The more humid the day… the more moisture released!

Unfortunately furnace filters do not capture all of the finest dust. Some of this settles on the A coil and is flushed off when the air conditioner is operating. Usually this dust is just flushed down the drain. However, over time the dust can accumulate in the plastic drain pipe; eventually blocking it. Now the only escape the water has is to flow over the top of the evaporator tray and down inside the furnace, to exit on the floor.

You can overcome the problem by finding where the drain pipe exits the furnace duct. 

Usually there is a half inch plastic pipe that goes to the floor drain. Just above the pipe you’ll find a plug and this is at the level of the evaporator tray. So, by removing that plug, you can clean any debris out. Blow through the plastic tubing from the outlet end to discover if you have a blockage. If there is blockage you will need to remove the plastic pipe and blow it out.

this point you have overcome the problem of a blocked drain and your floor will dry out! But, be very careful; the water that has leaked At down inside the furnace could have caused an electrical short or rusted out the heat exchanger. Be certain that all electric wiring and contacts in the furnace are dry and the heat exchanger is good repair before attempting to start the heating system.

It may be a very good idea to call in an expert to do this job for you!

Doug Hastings
MN Home Inspector, Minneapolis & St. Paul
ASHI Certified Inspector, ACI
Kaplan University, Home Inspection Lead Instructor

Rob ‘Pops’ Leslie
Kaplan Professionals, Retired

Your House Cracks

Home Inspectors get paid a lot of money every year just to look at other peoples cracks; cracks in plaster walls and ceilings, cracks in basement and garage floors, cracks in foundation walls.  To understand cracks the first thing a real estate agent or homeowner need to know is that almost all plaster and concrete cracks.  Seasonal changes in air temperature and moisture levels cause building materials, wood and concrete, to expand and contract.  Have you ever heard strange house noises that you didn’t recognize or couldn’t locate?  If so, it’s just another ‘house whisper’.  This type of movement is small and will typically have no long term impact on the building.

So when is a crack significant?

Seasonal movement cracks will range in width of 1/8 to 1/4 inch.  They will be consistent in size for the length of the crack and there could be more than 1 in the same location.  These cracks can be vertical, diagonal, horizontal, or in a step pattern.  It is very common for these cracks to be located near windows, doors, vaulted ceilings, basement floor posts and beams.  These cracks are aesthetic and mean absolutely nothing to the stability of the house.  Normal movement cracks probably make up about 98% of the cracks real estate agents and homeowners will typically see.

Structural movement cracks are different.  They are big, 3/8” or greater is size.  Many times these cracks are wider at one end than the other, in other words they are tapered width.  Sometimes one side of the crack will not be on the same wall or floor plane as on the other side of the crack.  This is uneven when a section of the wall or floor has moved but the other section didn’t.

Not comfortable with what you are seeing…

Uneven or differential movement is not OK and these cracks require close scrutiny by a ‘qualified’ and certified home inspector.  These experts will be able to ‘listen’ to what these cracks are saying and determine the next steps to pursue in correcting the problem.

Doug Hastings
MN Home Inspector, Minneapolis & St. Paul
ASHI certified inspector
Kaplan University, Home Inspection Lead Instructor

Rob ‘Pops’ Leslie
Kaplan Professionals, Retired

Are Leaky Houses Healthier?

State of MN doesn’t think so and has adopted a new energy code.

Most realtors and homeowners don’t realize since June 1, 2009 our housing has been subject to new residential energy requirements.  If interested you can download the full Energy Code called Chapter 1322 at www.dli.state.mn.us/ccld/pdf/sbc_1322.pdf

The entire MN Energy Code is essentially about 2 principles…

Envelope Performance
This is all about the rate of energy loss through the shell of the building.  Heat loss is caused by the continuous energy load within the house which is called Base Load.  This includes things such as lights, water heating, and cooking power.  We can control these losses by installing more efficient appliances and devices.  Outside air temperature also effects heat loss and this is called Seasonal Losses.  These losses are reduced by the proper installation of quality insulation, vapor barriers, and efficient sealing.

Ventilation
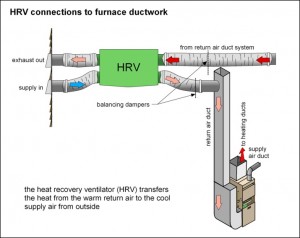
Because our homes have become so tight the rate of air exchange is practically nothing.  The new code requires a complete air change each hour.  Half of the air in a home can be exchanged by a continuously operating mechanical system and the other half by a passive means, like opening a window.  This can be accomplished with kitchen and bath exhaust fans that run continuously, but this isn’t the most efficient method.  A better way are with either a heat recovery ventilator (HRV) or energy recovery (ERV), but this way is very expensive.

Without these 2 principles in balance and working together, there can be great risk to the air quality of the home.  

Can you hear the whisper of stale air or mold?

Doug Hastings
MN Home Inspector, Minneapolis & St. Paul
ASHI certified inspector
Kaplan University, Home Inspection Lead Instructor

Rob ‘Pops’ Leslie
Kaplan Professionals, Retired

3 Easy Tips for Prepping Your Home for Winter

Trim the bushes…then fix the grade!

Winter is closer than you think, and it’s time to begin winterizing your house. Obviously I’m not talking about cleaning gutters at this stage! That will wait until after the leaves have fallen.

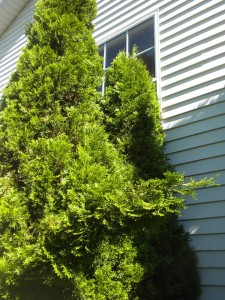
Prune shrubs and bushes first. This will let you see if adjustments to grade are necessary and it will make it possible for you to inspect all of the wall surfaces. Plants and bushes damage the house. If bad enough, you could even hear a scratching or rubbing noise inside. Second, check that the grade slopes away from the house, so that snow, turning to ice doesn’t just lay up against the walls for months. Remember with grade, you need it to be falling away from the house at an angle of 6 inches in the first 10 feet. Landscape rocks and wood chips are not the grade, they are decorative. It must be the earth below that slopes properly.

Have you purchased your tube of silicone caulk yet?

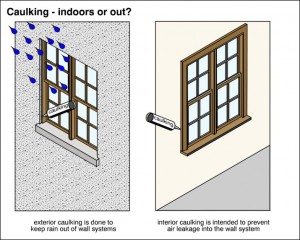
Well, I hope that caught your attention! Step 3, this is a great time to seal up any air leaks in the walls of your home. Finding and sealing wall penetrations is the most important part of your winterizing program! Your house is most likely under slight negative pressure. That means that air will be sucked from the outside atmosphere into your home when the furnace or other fans are operating. You don’t want that to be happening in the cold of winter!

Check any existing caulking carefully, particularly around doors and windows. Caulking deteriorates over time, and it will shrink or crack letting cold air into your home. Check for small holes and be certain that air is not leaking around such things as water faucets, TV and cable wires. Small holes can make a big difference. Can you hear the whisper of the wind blowing through the cracks in your house?

How do I know I filled all the cracks and holes?

There is a simple way to check for leaking around door and window frames. Turn on the furnace and any exhaust fans that you have in the kitchen and bathrooms and approach each frame with a burning candle. If the flame remains vertical, even when you are very close to the frames, you do not have a leak. Confirm this by keeping the candle very close to the frame and taking it all around the edges. If the flame bends into the room you have a frame leak that must be sealed. If the flame bends towards the window or door frame, your house is under positive pressure and this requires examination by an expert home inspector.

Listen for the soft sound of a breeze inside your home…Find and caulk all wall leaks and you will…be warm andsave a lot of money!

Doug Hastings
Certified Home Inspector, Minneapolis & St. Paul
ASHI certified inspector
Kaplan University, Home Inspection Lead Instructor

Rob ‘Pops’ Leslie
Kaplan Professionals, Retired

More About Swales: With Great Benefit Comes Great Responsibility

Are swales and culverts used often for drainage? 

Yes they are! Swales are often dug along property lines to direct water to street drains. Most people aren’t aware that there is even a drain there. They don’t take any particular notice of the depression in the soil and think nothing of it, when all of the water between the houses is directed to the storm drain instead of leaving pools on their property.

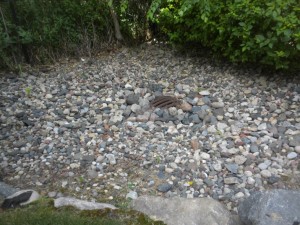
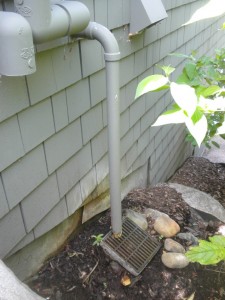
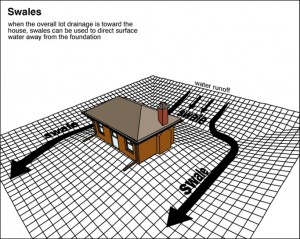
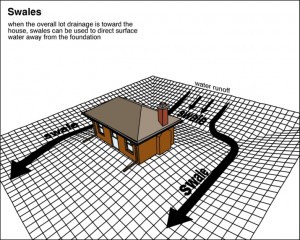
Take a look at this illustration of a swale and then the photograph of 10 properties that are swaled to a single culvert! What a wonderful solution to getting water off the properties… Maybe!

What if some of the 10 property owners leave trash in their swale depression, which is washed down to the culvert anytime it rains? Is anyone in the community going to be responsible for seeing that there is no trash building up on the grid during rainfall? Trash or debris building up on the culvert grid can become a very effective plug. A pond can be formed very quickly, behind the culvert opening, in heavy rainfall, which can in turn raise the water table on the surrounding land. Hopefully the drainage designer has allowed for such a possibility and has designed the residential lots, so that a rising water table will not flood the basements of the surrounding homes or cause the sump pumps to be operating continuously.

Swales are marvelous, but they do require maintenance and supervision. You can’t allow a swale on your property to build up with debris to a point where it causes water to flow onto the neighbor’s property or perhaps in the direction of your own basement. It is simply illegal to allow water to flow off your property on to your neighbors land and I’m sure you don’t want to wake up one morning with a wet basement yourself!

We would appreciate hearing from you, if you have an opinion or a question on swales. In fact, we would like to hear from you anytime you have a comment or an idea to share on any of these blogs. Communication is a two-way street, so let us hear what is going through your mind.

Doug Hastings
MN Home Inspector, Minneapolis & St. Paul
Kaplan University, Home Inspection Lead Instructor

Rob ‘Pops’ Leslie
Kaplan Professionals, Retired
That’s Just Swale: Water Drainage Help for Homes on Hills

What is the purpose of a drainage swale and when do we use it?

MN realtors and homeowners, you have been waiting patiently for the description of a drainage swale. So here it is! A drainage swale is a depression in the ground designed to direct water flow. You may have found one accidentally on a country road where a depression has been made to drain water from one side of the road to the other.  Sometimes, in order to avoid this dip or depression in the road surface, a pipe is placed underneath the road so water can more easily flow through it.  This underground pipe and manhole is called a culvert.

Swales are very effective at directing water flow away from the house. Imagine if your house was on a sloping lot with the house being part way up the slope and the water flowing down the hill toward the house. A swale could be installed, by creating a perpendicular depression, at a point above the house to deflect flowing water around the house. Then, it is directed into a culvert or a second swale taking all the water from the hill to the street drain. Swales may also be bermed on the lower side to direct flow and carry more water.

Berm… swale, culvert, berm… what strange words! The swale is a strategic depression in the ground that directs water flow and a berm is a man-made rise in the ground that achieves the same thing. An example of a berm would be levees that are used to contain flooding rivers.

Previously, I stated that we could use a swale in places where we could not create 6 inches of fall, in the grade, in the first 10 feet sloping away from the foundation of the house. Imagine if the boundary line of your house was within 5 feet of the foundation and there was only 2 inches in slope to the boundary; you would not be able to achieve the code required 6 inches ground slope in the first 10 feet of fall. This could be achieved by digging a 4 inch deep swale perpendicular to the foundation, with 2% fall to the road drain. Water would flow freely to the road and away from the home foundation.

What is the purpose of the swale?  Home inspectors know and now you do too!

Doug Hastings
MN Home Inspector, Minneapolis & St. Paul
Kaplan University, Home Inspection Lead Instructor

Rob ‘Pops’ Leslie
Kaplan Professionals, Retired
9 Steps for Solving Unseasonably Wet Basements

What can a homeowner or real estate agent do NOW to better protect their homes against moisture intrusion?

This question is coming up all of the time this year. 2013 is a little unique and if the home that you have owned for years, or have just purchased, has moisture in the basement; you may just be experiencing the strange end to the past winter. We have had lots of rain and freeze thaw conditions that have overcome basement protection in many MN homes. You are likely discovering that basement protection that has worked for many years has simply been overwhelmed by seasonal conditions.

Homeowners, follow these 9 Steps to prevent a repeat of this year’s conditions causing moisture problems in the lower level of your home.

  1. Clean out and cover, window wells
  2. Fill all low spots along the side of your foundation
  3. Grade the soil away from the exterior wall, to an angle of 6 inches fall, in the first 10 feet from the foundation. If you don’t have 10 feet from the foundation to an obstruction or the boundary line; create a swale. Swales will be described in the very next blog.
  4. Clean out and replace or repair any damage to gutters
  5. Make sure gutter downspouts extend at least 6 feet away from the foundation
  6. Verify the neighbors’ gutter extensions are not directed towards your house
  7. Test the sump pump
  8. Make sure the sump pump exterior discharge pipe extends at least 10 feet away from the foundation (not into the laundry tub or floor drain)
  9. Have a battery backup sump pump installed


MN real estate agents, when contracting a home inspector in the future; be certain that you have employed someone who is on top of their game and very knowledgeable about grading, drainage, and sumps. Fail to employ a knowledgeable and diligent inspector and you may pay the price in a year like 2013.

When buying or selling a home, it is important to use the services of the best MN home inspector that you can find. Do your due diligence, and be certain that you are employing somebody who doesn’t miss the details. Ask yourself…

Can this inspector find the elusive signs of occasional water problems as well as all the other issues found in today’s homes?

Doug Hastings
MN Home Inspector, Minneapolis & St. Paul
Kaplan University, Home Inspection Lead Instructor

Rob ‘Pops’ Leslie
Kaplan Professionals, Retired
MN Inspectors Represent the House

What does “the home inspector represents the voice of the house” mean?

Typically, MN home inspectors are contracted to inspect the home for either a buyer or seller. This is usually recommended and arranged by their real estate agent. Often customers feel because they are paying for the inspector’s report that they can influence the content. Sadly, in a few cases, that is exactly what happens…but should it?

Good home inspectors are not influenced by the customer; they simply report accurately on the condition of the house at the time of the inspection. This is required by their national Standards of Practice, which is where the idea that “the home inspector represents the voice of the house” comes from. The home inspector must focus on the condition of the house at the time it is being inspected. Folding to the pressure of the customer or real estate agent and becoming their advocate is very tempting. Some home inspectors do fold to this pressure, believing that it will make them popular and that other customers will soon follow. The sad fact is that these inspectors soon leave the business because the real estate professionals, home buyers and sellers soon get to understand that their reports cannot be relied upon to accurately express the condition of the home. The inspector’s written report must be honest, accurate, and completely unbiased.

Accurate reporting on the condition of the house is both moral and vital!

Sellers need to know how the quality of the house, at time of sale, compares with other similar houses being sold in the same area so that they may set a realistic selling price. Buyers want to know exactly what is it that they are buying. All parties, being accurately informed, can accommodate cost and service issues within their buying/selling decision, providing they know fully what to expect.

Which inspector would you choose; the one who reports accurately and completely on the condition of the house or the one that tells a story that you would like to hear?

Doug Hastings
MN Home Inspector, Minneapolis & St. Paul
Kaplan University, Home Inspection Lead Instructor

Rob ‘Pops’ Leslie
Kaplan Professionals, Retired
RADON METHODS – YOU CHOOSE

What is the difference between passive and active radon control? This question is often asked since the Minnesota Department of public health announced the new radon initiatives, effective January 1, 2014.

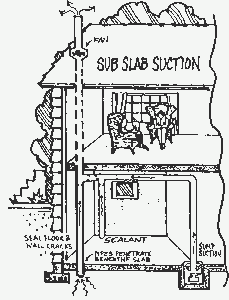
Passive radon control simply means that radon gas developing beneath the floor of the basement will be transferred to the outside of the house by a three or 4 inch diameter plastic tube, without the aid of a fan. ABS, which is black plastic tubing or PVC, which is a white plastic tube, may be used in the system, but; the two are not to be joined together. Their chemical joining systems are not compatible.

The passive system can only be used in areas of the home that are heated because the means of getting the radon from under the basement floor system and out of the house, through the roof, relies on the natural effect of heated air rising. Passive systems are usually found in new construction because the house designer can create a simple flow path within the building structure from below the basement floor to 12 inches above the roof and; a passive system is all that is required under the IRC code, adopted in Minnesota.

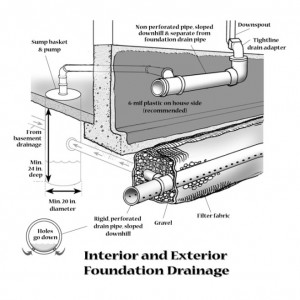
New home design in Minnesota, takes advantage of the code required drain tile system that surrounds the house. The drain tile usually drains into a floor sump where moisture gathers to be expelled to the outside via a sump pump. Most modern sumps have a sealable lid with provision to install the radon tube. The warmed air rising in the radon exhaust tube lowers the pressure in the entire drain tile system so directing all radon under the floor system to atmosphere without ever entering the home. The passive system, costing just a few hundred dollars, is a satisfactory system that cannot be said to be ideal in either new or existing construction.

The active system however, costing only a few hundred dollars extra, guarantees control of the gas flow from under the house footprint to atmosphere. The Minnesota Department of public health recommends the active system and calls it the gold standard. Active systems have a silent exhaust fan, that is usually installed either in the attic of the home or on the outside of the house where they can suck radon out without having to rely on the physics of heat rising or passing through the house structure. The precise amount of suction can be confirmed by a simple chemical filled plastic tube (costing about $12), called a manometer, that is installed on the radon tube, in a place where it can easily be observed. Discounted radon fans may be purchased at the Minnesota Department of public health to reduce the cost of the radon installation.

Rob ‘Pops’ Leslie MN

Home Inspection
Minneapolis & St. Paul

Kaplan Professionals (retired instructor)

Categories

BLOGS BY CATEGORY