Are All Smoke Detectors Alike?

Most people assume a smoke detector is a smoke detector…this is not true.

In the mid 1970’s less than 10% of homes had a smoke detector; now over 90% do. Nevertheless, this dramatic increase in smoke detectors has had little impact on the risk of death by fire. Why? Some studies have indicated that many smoke detectors are either inoperable or have been disabled. Nuisance alarm activations are a major reason why detectors are disabled. National Fire Protection Association, NFPA, studies have indicated ionization alarms account for over 95% of all nuisance alarms.

Another reason is the age of the smoke detector. All smoke detectors should be replaced every 10 years.

What are the statistics on ionization vs. photoelectric smoke detectors?

62-1The majority of residential fire fatalities are due to smoke inhalation. Ionization detectors respond an average of 15 to 50 minutes slower than photoelectric. Some studies indicate they completely fail to work 25% of the time. However, ionization detectors respond faster in fast flame fires. Studies show 30 to 90 minutes quicker than photoelectric. Certainly, either smoke detector is better than none at all. Of course, a functioning smoke detector is most important. But if time and reliability are vital to our chances of surviving a smoldering fire, a photoelectric smoke detector is the best type to install in your home.

Less than 10% of all smoke detectors in homes are photoelectric.

Doug Hastings
MN Home Inspector, Minneapolis & St. Paul
ASHI Certified Inspector, ACI
Kaplan University, Home Inspection Lead Instructor

Faulty Smoke Detectors

In a fire, the issue is time.

Minutes and many times seconds will make the difference between life and death. The combustible materials in our homes are different from the past and the technologies of smoke detectors have also changed. There are two types of smoke alarms, ionization and photoelectric. 90% of homes have ionization smoke detectors installed; about 5% are photoelectric and the rest have no alarm at all. The type of smoke alarm can be the difference between your family getting out of the house in time or not.

To better understand the importance of this; there are two types of residential fires, ‘fast flame and smoldering’. The vast majority of residential fire fatalities are due to smoke inhalation from a smoldering fire. And almost two-thirds of these fatalities occur at night while the occupants are sleeping. Photoelectric smoke detectors are by far the best for smoldering fires. Ionization detectors are very slow to respond to smoldering fires. Actually, Ionization detectors have proven to be significantly less reliable in both ‘fast flame and smoldering’ fires.

61-1What type of smoke detectors do you have in your home?

Daylight saving time is a great time to change the batteries in your smoke detectors. This year you should also examine the label on the back of your detectors. If the label says anything about radioactive material, Americium 241, or model number has an “I” then it is ionization. You should replace these detectors with photoelectric. More facts will be in next week’s blog.

All smoke detectors are not alike. Make sure you are protecting your family with the best fire alarm possible.

Doug Hastings
MN Home Inspector, Minneapolis & St. Paul
ASHI Certified Inspector, ACI
Kaplan University, Home Inspection Lead Instructor

Is Some Moisture OK?

Home inspectors are often asked to render opinions on other professionals work. Many times we are challenged by licensed professionals, such as engineers, architects, and contractors, who feel differently about a problem.

Who is right?

Remember professional inspectors offer an OPINION of the condition of a building. This should be an informed opinion based upon knowledge and experience; but it is OUR opinion and not someone else’s. Sought after home inspectors are often in disagreement with others and we need to be firm in our conclusions if we are to best serve our clients.

Recently, I inspected a 7 year old commercial building that was in bank foreclosure. My first and primary concern was moisture intrusion. I began my analysis on the exterior of this concrete block and brick structure. Soon, I found a number of details that concerned me:

  • The roof valley drainage was restricted by a decorative facade
  • No rubber gaskets were on the nails of the roof to wall metal flashing
  • Many brick wall locations requiring weep ropes had none or were mortared over
  • The window and door steel lintels were painted but had already rusted

When I went inside I observed:

  • Water stains on the concrete floors and plaster ceilings
  • Water stains on the window sill frames

Shortly after relating these concerns to my client, I received an engineering report on the building. Evidently, the building had already been in litigation and this had not been disclosed to my client. The engineering report confirmed many of my findings.

The engineering firm designed a very thorough and costly solution to this complex problem. It included all new window, door, and roof flashing, as well as adding brick weep ropes. I recommended that these detailed repairs be completed to resolve the issue and keep the water out of the building. However, the engineer also said that this problem could be managed by water sealing the exterior bricks. In the end, the bank determined that sealing the face of the bricks was sufficient to correct the problem and resell the building.

My client looked to me to advise them on this matter. Was I OK that this moisture problem had been resolved with a thin coat of brick water sealer?

How do you feel about it?

Email me at doug@citiesinspection.com with your opinion and I will reply with mine.

Doug Hastings
MN Home Inspector, Minneapolis & St. Paul
ASHI Certified Inspector, ACI
Kaplan University, Home Inspection Lead Instructor
 

Go With What You Know

Approximately 90% of all structural building failures are caused by moisture. With the exception of the homeowner, moisture is the #1 enemy of the house. Unfortunately, moisture damage typically occurs in concealed spaces. This makes it difficult for most home inspectors to identify.

Good inspectors know there are 3 major elements that impact the risk of moisture intrusion.

  1. The more complex the design of the home the higher the risk.
  2. Poor drainage of water on or around the house increases the danger.
  3. Missing or improper flashing details can be a disaster.

Based upon the analysis of these 3 principles, an experienced inspector will determine whether the probability of concealed moisture damage is low, medium, or high. Regardless of what other ‘experts’ may say, home inspectors are required to communicate these observations to our client and make the appropriate recommendation.

Let me give you an example. Within the last year I inspected an Italian Renaissance home with an elaborate and complicated building design. This building included numerous room projections from the main structure, a 3rd level tower, and a traditional stucco exterior finish.

A flat roof deck was incorporated within the main hip roof structure that included a large skylight and an internal drainage system.

Flat Roof Deck & Skylight
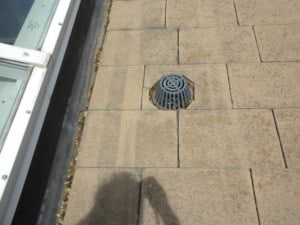
Internal Roof Drain

The perimeter of all windows, doors, band boards, and corners had ‘bump out’ projections without any flashing. Doors onto the flat roofs were level with the deck and had no room for threshold flashing. The stucco was extended below grade without any drip screed flashing. And the roof did not include kickout flashing.

Bump Outs With No Flashing
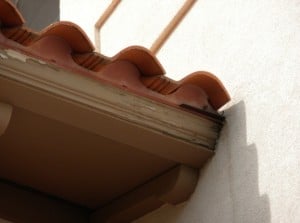
No Kickout Flashing

Seemed like a no brainer…complex house design, poor roof drainage, and missing flashing details made this high risk. However, the home had been previously moisture tested by a very reputable contractor. The infra-red imaging and meter probing results were all negative. The ‘expert’ concluded no to low probability of moisture intrusion.

Should a professional home inspector change their conclusion and recommendation? Absolutely not, go with what you know. In this example my clients relied upon the moisture testing, moved into the home and quickly discovered the exterior wall structure was rotted out, the house was unsafe to live in and would require over a half a million dollars to fix.

Always remember…STAY WITH WHAT YOU KNOW…an inspector is paid for their opinion not someone else’s.

Doug Hastings
MN Home Inspector, Minneapolis & St. Paul
ASHI Certified Inspector, ACI
Kaplan University, Home Inspection Lead Instructor

Visit and ‘Like’ our Cities Inspection Facebook page for more home updates.

Radon Testing Protocols

Does your radon tester follow the EPA guidelines?

In a real estate transaction most radon tests are performed by the home inspector. There is nothing wrong with that, but there is the assumption that they are doing it ‘right’. This may or may not be true. The proper testing protocol you should expect is the following:

  • Homeowner contacted to discuss the test and EPA rules.
  • The house closed up, doors and windows shut, a minimum of 24 hours before test.
  • Set the monitor at the lowest potential habitable level of the home.
    •    Approximately 3’ to 6’ off the floor.
    •    Centrally located and not on outside walls.
    •    3’ from a furnace supply or return air register.
    •    6’ from a fireplace.
  • A notice describing the do’s and don’ts left on the kitchen counter.
  • A notice at all entry doors reminding people to keep the doors closed.
  • Short term tests should be between 48 and 72 hours long.

EPA guidelines are not regulated by the state of MN.

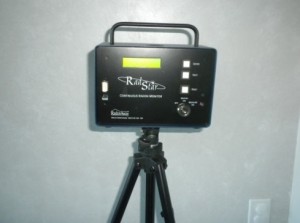
Unless you are certain about who is doing your radon test, you should ask for a copy of their certification and a document verifying the monitor has been calibrated within the last year. An electronic tamper-proof monitor is the best way to assure accurate test results.

A faulty test puts the home’s occupants at high risk.

Doug Hastings
MN Home Inspector, Minneapolis & St. Paul
ASHI Certified Inspector, ACI
Kaplan University, Home Inspection Lead Instructor

‘Like’ our Facebook page and Cities Inspection will keep you informed on a radon inspections in MN.

Controlling Radon Gas

In Existing Homes:

After testing for radon and if the level exceeds 4.0 picocuries, the next step is to begin mitigation. You should look for a ‘certified mitigation contractor’. They will have completed the EPA required training and testing. In a nutshell mitigation for an existing home includes the following:

  • Cover all exposed earth with a 6 mil poly and seal all edges.
  • Caulk all cracks and openings in the floor slab.
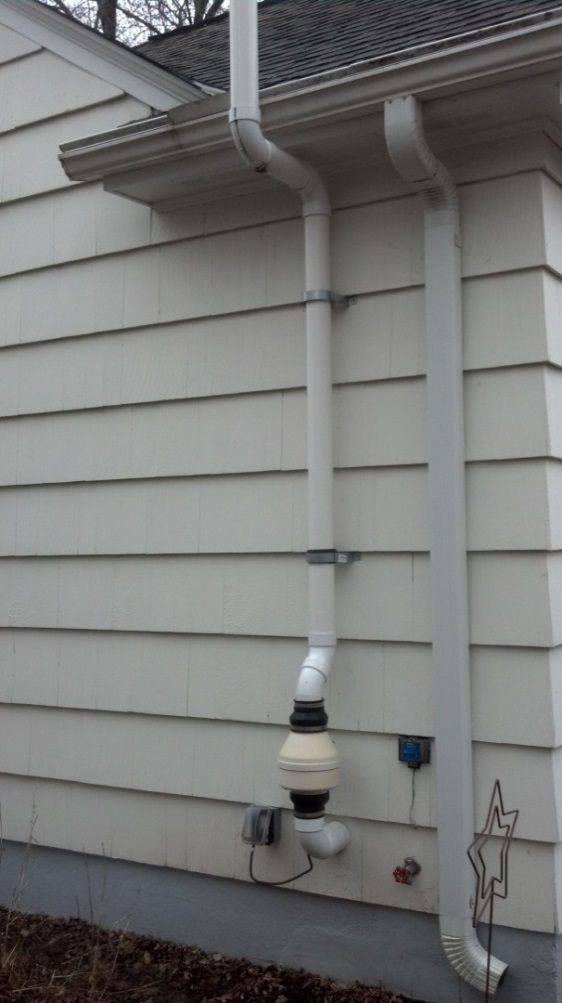
  • Put a 3” pipe in the earth, thru the floor slab, or in a sump.
  • Install the pipe inside or outside the house.
  • Extend the pipe a 12” above the surface of the roof.
  • Pipe must terminate minimum of 10’ from a window
  •  Pipe must terminate 10’ from another home.
  • Re-test and verify a level of 4.0 picocuries or less.

In New MN Homes:

There is no preliminary testing. The state requires either a passive or active system that consists of the following construction requirements:

Below the floor slab a minimum of 4” of gas –permeable aggregate or sand.

  • Cover the sand or aggregate with a minimum 6 mil poly overlapped a minimum of 12”.
  • All penetrations thru or joints in the slab must be caulked.
  • Hollow core blocks must have at finished grade a solid course of blocks.
  • Exterior walls of foundation must be dampproofed below grade.
  • Ducts below the slab must be continuous or sealed.
  • A plumbing tee inserted below the floor slab and poly.
  • A minimum 3” pipe extended thru the building and marked as radon pipe.
  • Pipe must terminate 12” above the roof and a minimum of 10’ from a window or another house.
  • A fan (active) is optional.  No fan (passive) or radon testing is required.

Radon gas is real…this hazard should be taken seriously.

Doug Hastings
MN Home Inspector, Minneapolis & St. Paul
ASHI Certified Inspector, ACI
Kaplan University, Home Inspection Lead Instructor

‘Like’ Cities Inspection’s Facebook page for more great tips on things to watch for in your home!

No More Debate…Radon Kills

Radon mitigation is part of the MN State Building Code. 

What does it mean when the MN State Building Code is modified to include radon mitigation methods as a requirement to build a house? Building codes are ‘minimum’ safety standards for construction. This says a lot about how dangerous radon gas is. It is no longer a scientific theory, it is a reality. Most of MN is designated as having radon amount levels greater than the EPA standard 4.0 picocuries. And did you know the EPA standard may soon be lowered to 2.0 picocuries.

Radon disclosure is part of the MN Real Estate Disclosure Statement.

There is misinformation about how radon gas travels. Too many people think that if their neighbor has a low radon level in their home it means they must too. It doesn’t work that way. Radon concentrations are a combination of soil decay, construction methods and materials used in building each home, and the occupant’s use of the house. Together these factors contribute to elevated radon levels. For these reasons and more, MN now requires disclosure of any radon testing that has occurred in a home being offered for sale. Unfortunately, there are no rules regulating radon testers; that part is still buyer beware.

Radon testing is not regulated in the state of MN. 

Make sure your test is performed by a nationally ‘certified’ technician using the highest quality, calibrated, and tamper-proof electronic monitor.

Doug Hastings
MN Home Inspector, Minneapolis & St. Paul
ASHI Certified Inspector, ACI
Kaplan University, Home Inspection Lead Instructor
Radon Gas is a Proven Danger

January is National Radon Awareness Month.

Radon gas and real estate don’t mix well. The more energy efficient we make our houses the greater the risk of developing radon induced lung cancer. The radon gas health concern is no longer debatable; it is the #1 cause of lung cancer for non-smokers and the #2 cause for smokers. MN homeowners, real estate agents, builders, and home inspectors should do all they can to identify, assess, and resolve this ever present threat to our families.

Most people know that radon gas is a colorless, odorless gas that occurs naturally in the decay of soil below all houses throughout the U.S. What most people don’t know is the southern and central portion of MN is designated by the national building code as Zone 1 having the highest potential for elevated radon levels in the basement, main and upper levels of our homes. Because our senses are not aware of its presence, this danger has long been overlooked and ignored.

Times have changed.

Some have argued the rapid increase in radon awareness is attributable to the “me” generations X and Y concern for themselves and their children. Maybe so, but there is a huge increase in ‘boomers and grey’s’ having their homes tested too. A possible reason could be their concern for children and grandchildren. Or maybe everyone just wants to live a longer and healthier life. For little money and inconvenience everyone can have their homes tested for radon. It takes only 2 days and all you have to do is keep your windows closed. That’s why January through March, the heating season, is the best months to perform a test.

It might be time to have your home tested!

Doug Hastings
MN Home Inspector, Minneapolis & St. Paul
ASHI Certified Inspector, ACI
Kaplan University, Home Inspection Lead Instructor


Wet Where and Wet When

What Makes My Window Panes Wet?

Problem:  The window is wet on the room side of the glass for a few weeks in fall.

Solution:   Moisture has accumulated, over summer, in the structure of the house from cooking, showering, and even the family breathing. This can be overcome by having fans exhausting to the outside in the kitchen, bathrooms and laundry.

Problem:  The window is wet or has frost on the room side of the glass in the winter.

Step 1:  Keep window drapes up 2-3” above the window sill to allow for air circulation.

Step 2:  Install bath and kitchen exhaust fans that vent directly to the outside of the home.  Turn on the fan when room is in use.

Step 3:  Put timer switches on all exhaust fans; keep the fan running for a half hour after the user leaves the room.

Step 4:  Install a continuous rated exhaust fan in the highest level hallway or bath.  This fan should be variable speed from 30 to 110 cubic feet per minute (CFM).  Be sure there is an outside air supply into the furnace room in the basement.  Leave fan running 24/7.

Solution:  Take this slowly, one step at a time.  You may not need to do all 4 steps.

Problem: The window glass is wet or fogged in between 2 glass panes all year round, but most noticeable in the winter.

Solution:

Insulated glass:  The air seal is leaking and glass must be replaced.

Storm windows:  Glass putty must be in place and sealed tight to wood sash.  Wood sash must be sealed tight to the window frame.

All humidity problems are fixable.  Winter relative humidity levels are typically 30 to 40%.  On super cold days you may need to reduce the humidity to 25%.

Doug Hastings
MN Home Inspector, Minneapolis & St. Paul
ASHI Certified Inspector, ACI
Kaplan University, Home Inspection Lead Instructor
‘Pops’ Rob Leslie
Kaplan Professionals, Retired


Follow Cities Inspection’s on Facebook for more informational house tips.

There’s a Mouse in the House

Mice are colonizers…so it is very unlikely that you have only one mouse!

If you give a lonely mouse the opportunity, through breeding, you will very soon have 100 mice. Controlling this problem begins with recognizing how you discovered this furry creature.

Did you see it?  Then place a peanut butter baited trap alongside the wall where you saw the mouse.  Alongside the wall is important, because mice do not voluntarily come out into open spaces. Another more aggressive food is poison bait. These baits are very effective because mice usually carry them back to the colony. You must however be very careful and certain that you are placing the baits in a place where they will not be picked up by humans or animal pets. If you have children or pets, you would be well advised not to use poison baits.

Did you hear it scratching in the walls? If you heard scratching in the wall, remove the base trim at the point of the scratching, drill a hole just above the base plate (that is the horizontal board on which the wall is built) and pour poison bait, containing warfarin, into the cavity. Using warfarin based bait is important; otherwise you will have the smell of decomposition after the mice have died. Close the hole with a rubber stopper, don’t use cork, because mice consider cork a tasty meal.  Replace the base trim and the mice will soon be gone.

Did it chew through a food package in the pantry? Do not remove damaged food packages immediately. Place a trap, baited with peanut butter, right alongside the hole in the package. You may not like leaving the damaged food package in place because of the hygienic implications. But think about it for a moment; if the package is moved mice will be scampering over all your other food while they are looking for their supper. Leave the trap for two days and then cleanup and sterilize the area.

Did you see droppings? Mouse droppings are a sign of a social meeting place. So, set a peanut butter baited trap in among the droppings and you will catch you a mouse. Don’t bother setting another trap in the same place because mice are smart, they will get the message.

Right now mice are looking for a warm spot to live and start a family.

It is no accident when a mouse gets into the house! To keep mice out of your house, you must seal up every possible entry point. These may be hard to find because they can be as small as a ¼” crack or a hole in the wall the size of a dime. Sometimes missing window and door weather-stripping or caulking is the culprit. More often, look where air conditioner, clothes dryer, plumbing and electrical pipes come through the wall.

Mice are crafty contortionists, so be patient, finding these entry points can be challenging!

Doug Hastings
MN Home Inspector, Minneapolis & St. Paul
ASHI Certified Inspector, ACI
Kaplan University, Home Inspection Lead Instructor

‘Pops’ Rob Leslie
Kaplan Professionals, Retired


Follow Cities Inspection’s on Facebook for additional homeowner tips.

3 Fire Proof Bypasses

Fire barriers are often compromised and the homeowner never knows it.

Home fire barriers have been a part of the building code since about 1960.  Homes built prior to that time were not required to have any fire protection and many different fire proofing methods have been added since then.  Fire safety is a big part of building codes as it should be.

Did you know that most house fires start in the garage?

Most of the time even old homes have been modernized with many current fire barriers in place.  Three of the most common breaches in the garage fire barrier are:

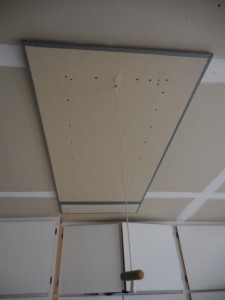
    1. Pull down attic stairs
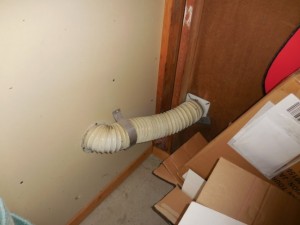
    2. Clothes dryer and bath fan exhaust fan vents
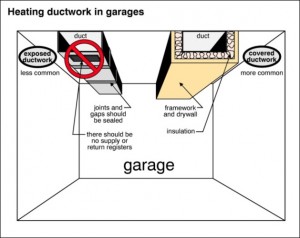
    3. Furnace heat ducts

The bottom of attic pull down stairs is plywood and when closed this does not provide an adequate fire barrier.  The solution is to install fire rated sheetrock on the plywood cover.

For exhaust vents and heat ducts it’s as simple as extending the pipe through an outside wall and building a fire rated box around the pipe.


These simple garage improvements will protect the home against a fire entering the house.

Doug Hastings
MN Home Inspector, Minneapolis & St. Paul
ASHI Certified Inspector, ACI
Kaplan University, Home Inspection Lead Instructor
‘Pops’ Rob Leslie
Kaplan Professionals, Retired


If you are interested in more home inspection info – ‘like’ Cities Inspection’s Facebook page.

Is That Room Legal?

Homeowners, realtors and home inspectors can have different views as to what constitutes a habitable room. Why does this matter? Because a converted room, such as a porch, basement, or attic, finished into “living space” may not be quite as livable as expected. So let’s have a look at it here.

According to the International Residential Code (IRC) and the MN State Building Code, habitable rooms are used for cooking, eating, living, or sleeping.

Because a room does not meet a habitability requirement does not mean it is not legal. The term habitability is misleading in that a room can be used for whatever purpose the homeowner chooses.  The following rules are guidelines for existing homes and requirements for newly built homes; a room must have:

  • Light – sunlight through a glazed window equal to 8% of the room floor area.
  • Ventilation – open able window equal to 4% of the room floor area.
  • Ceiling height – 7’ minimum.
  • Total area – 70 sf. minimum.
  • Width – 7’ minimum.
  • Bedrooms must have an egress sized window, but do not require a closet.
  • Kitchens are an exception – they do not need to meet the size or window requirements, but would then be required to have mechanical ventilation ducted to the exterior.

Non-habitable rooms are bathrooms, laundry rooms, closets, and hallways. These spaces are not required to meet any of the above requirements; however, bathrooms must have either a window or exhaust fan ducted to the exterior.

When purchasing a home or finishing a room be sure to take these rules into consideration, it could affect your investment.

Doug Hastings
MN Home Inspector, Minneapolis & St. Paul
ASHI certified inspector, ACI
Kaplan University, Home Inspection Lead Instructor
‘Pops’ Rob Leslie
Kaplan Professionals, Retired


Cities Inspection’s Facebook page has more interesting info on inspections and property issues. Check us out and ‘like’ us!

My Ice Dams Are Really Bad

Icicles indicate the formation of ice dams. What do ice dams indicate?

Icicles form where water is dripping from the roof when snow is melting and the air temperature is less than freezing. Older houses are most prone to ice damming and large icicle formation. Recent building and energy codes addressed this problem and provided solutions. Assuming homes built in last 40 years are properly constructed, they have little to no problem with icicles. This is because the heat loss through the ceiling is small and warm house air does not reach the roof. Current roof ventilation design and adequate ceiling insulation will not allow snow to melt and refreeze as it crosses the cold overhang of the roof. This refreeze forms the ice wall that causes water backup under the roof shingles. This is also how the interior ceiling, wall, wood structure and insulation become water damaged.

Remember mold forms in building materials that remain wet longer than 48 hours. 

Today, what can be done about a problem that is knocking on the door? The only answer is to have the ice dam professionally removed by an insured contractor. However, the long term solutions is to have an expert assess attic insulation and ventilation levels, examine for proper roof flashing and shingle underlayment, determine if poor roof design necessitates using heat cables.

Converting roofs to meet a standard that will prevent ice dams is not difficult, but it can be costly. 

Begin the solution to your ice dam problem with an unbiased home inspector analysis. Or ‘Like Us’ on Facebook for more day to day information.

Doug Hastings
MN Home Inspector, Minneapolis & St. Paul
ASHI certified inspector, ACI
Kaplan University, Home Inspection Lead Instructor

Rob ‘Pops’ Leslie
Kaplan Professionals, Retired

Is Your Life Worth $25?

This very cold winter has been responsible for many accidents, including deaths from CO (carbon monoxide) poisoning. 

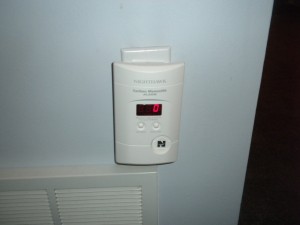
These disasters might have been averted if a properly located and operating carbon monoxide alarm had been installed. For just $25 a battery-operated or for $50 a hardwired alarm can be purchased and installed.

What is CO?  Carbon monoxide is a toxic gas that is tasteless, odorless, invisible, and none irritating gas. It also weighs approximately the same per cubic foot as the air in your house. If it is going to poison you, you won’t know anything about it!

What causes CO?  CO is a product of incomplete combustion due to an insufficient oxygen supply. This can occur by not supplying a fossil fuel burning appliance with enough air. Your furnace, water heater, fireplace, automobile either needs to be located in a wide open space or have an outside air supply. There are formulas for how big an open space is needed, but by installing an outside air supply you are assured of having sufficient air for complete combustion. Or carbon monoxide occurs when fossil fuel appliance burners are incorrectly tuned or when the burner exhaust system is blocked or leaking. In other words you are re-burning the original exhaust products. A safe appliance produces carbon dioxide (CO2). Only when there is not enough oxygen in the air or when you re-burn oxygen from the CO2 does the appliance become a CO producer.

All homes should have a CO detector within 10’ of all bedrooms.

What is the action level?  Obviously you would like to have zero CO in your house. But that may not be possible; you should expect a level of less than 15 ppm in your home. Exposures at 100 ppm (parts per million) or greater can be dangerous to human health. At this level the symptom would be a slight headache in 2-3 hours of exposure. People who survive CO poisoning and complain of low to severe headaches and nausea are lucky. They just got a relatively low dose of this insidious poisoning. Elevated levels of CO will simply kill you before you know anything about it.

All systems that burn fossil fuels… Oil, Gas, Wood… should be examined and tuned by an expert annually.

Doug Hastings
MN Home Inspector, Minneapolis & St. Paul
ASHI certified inspector, ACI
Kaplan University, Home Inspection Lead Instructor

Rob ‘Pops’ Leslie
Kaplan Professionals, Retired


Does Your House Breath?

I never had frost buildup on my windows before!

Like many houses my 1974 rambler was in need of attention.  For the past 5 years my justification for postponing the needed exterior maintenance was the bad economy.  I felt investing a large sum of money in the house was not wise.  Some of you may agree with this and some will not.  Regardless, at the insistence of my wife, last summer became the year of THE HOME IMPROVEMENT.  We contracted for new roof, windows, doors, siding, soffits and fascia.  Keep in mind to meet new state building and energy code requirements housewrap, window and door flashing, caulking, weather-stripping, and low E glass need to meet a very high standard of insulation and heat loss.  This old leaky house no longer leaked.  It is warm and comfortable inside, but this lack of breathability resulted in very large frost buildups on all of our windows and doors as soon as the weather changed.  Any home inspector would quickly recognize this as a problem that needed to be resolved now.  By ignoring this very obvious moisture sign, which many homeowners do, the next concern is going to be mold.  (http://bit.ly/19ut8aA)

I never had radon before!

But…it didn’t stop there.  As a MN home inspector radon testing is a big part of our business operation.   I had tested the basement previously and my radon concentration was at the minimum EPA standard of 4.0 picocuries.  Upon re-testing after the exterior remodeling was completed, my radon level is 3 times higher.  What is the lesson to be learned from these 2 events? (http://bit.ly/1huOoxd)

Houses work as a system.  By changing the exterior envelope of a home it will have a huge impact on how the interior functions.  What was never a problem yesterday may be a major problem today. 

Doug Hastings
MN Home Inspector, Minneapolis & St. Paul
ASHI certified inspector, ACI
Kaplan University, Home Inspection Lead Instructor

Rob ‘Pops’ Leslie
Kaplan Professionals, Retired

Categories

BLOGS BY CATEGORY